Setting Up My First Home Server
You don't need expensive hardware to start a homelab. An old laptop is enough to get started.
Introduction
I’ll keep it short. I wanted to set up a homelab to learn, obviously, but also to have a place to experiment with different technologies without breaking anything important. I was already somewhat familiar with Linux and self-hosting, so I figured this was the natural next step.
The Hardware
For the hardware, I had an old laptop lying around that I figured was worth putting to use. It’s an Asus X441MA with a depleted battery, a broken CPU sensor chip that throttles the processor, a half working display, and a fan that never quite learned to be quiet.
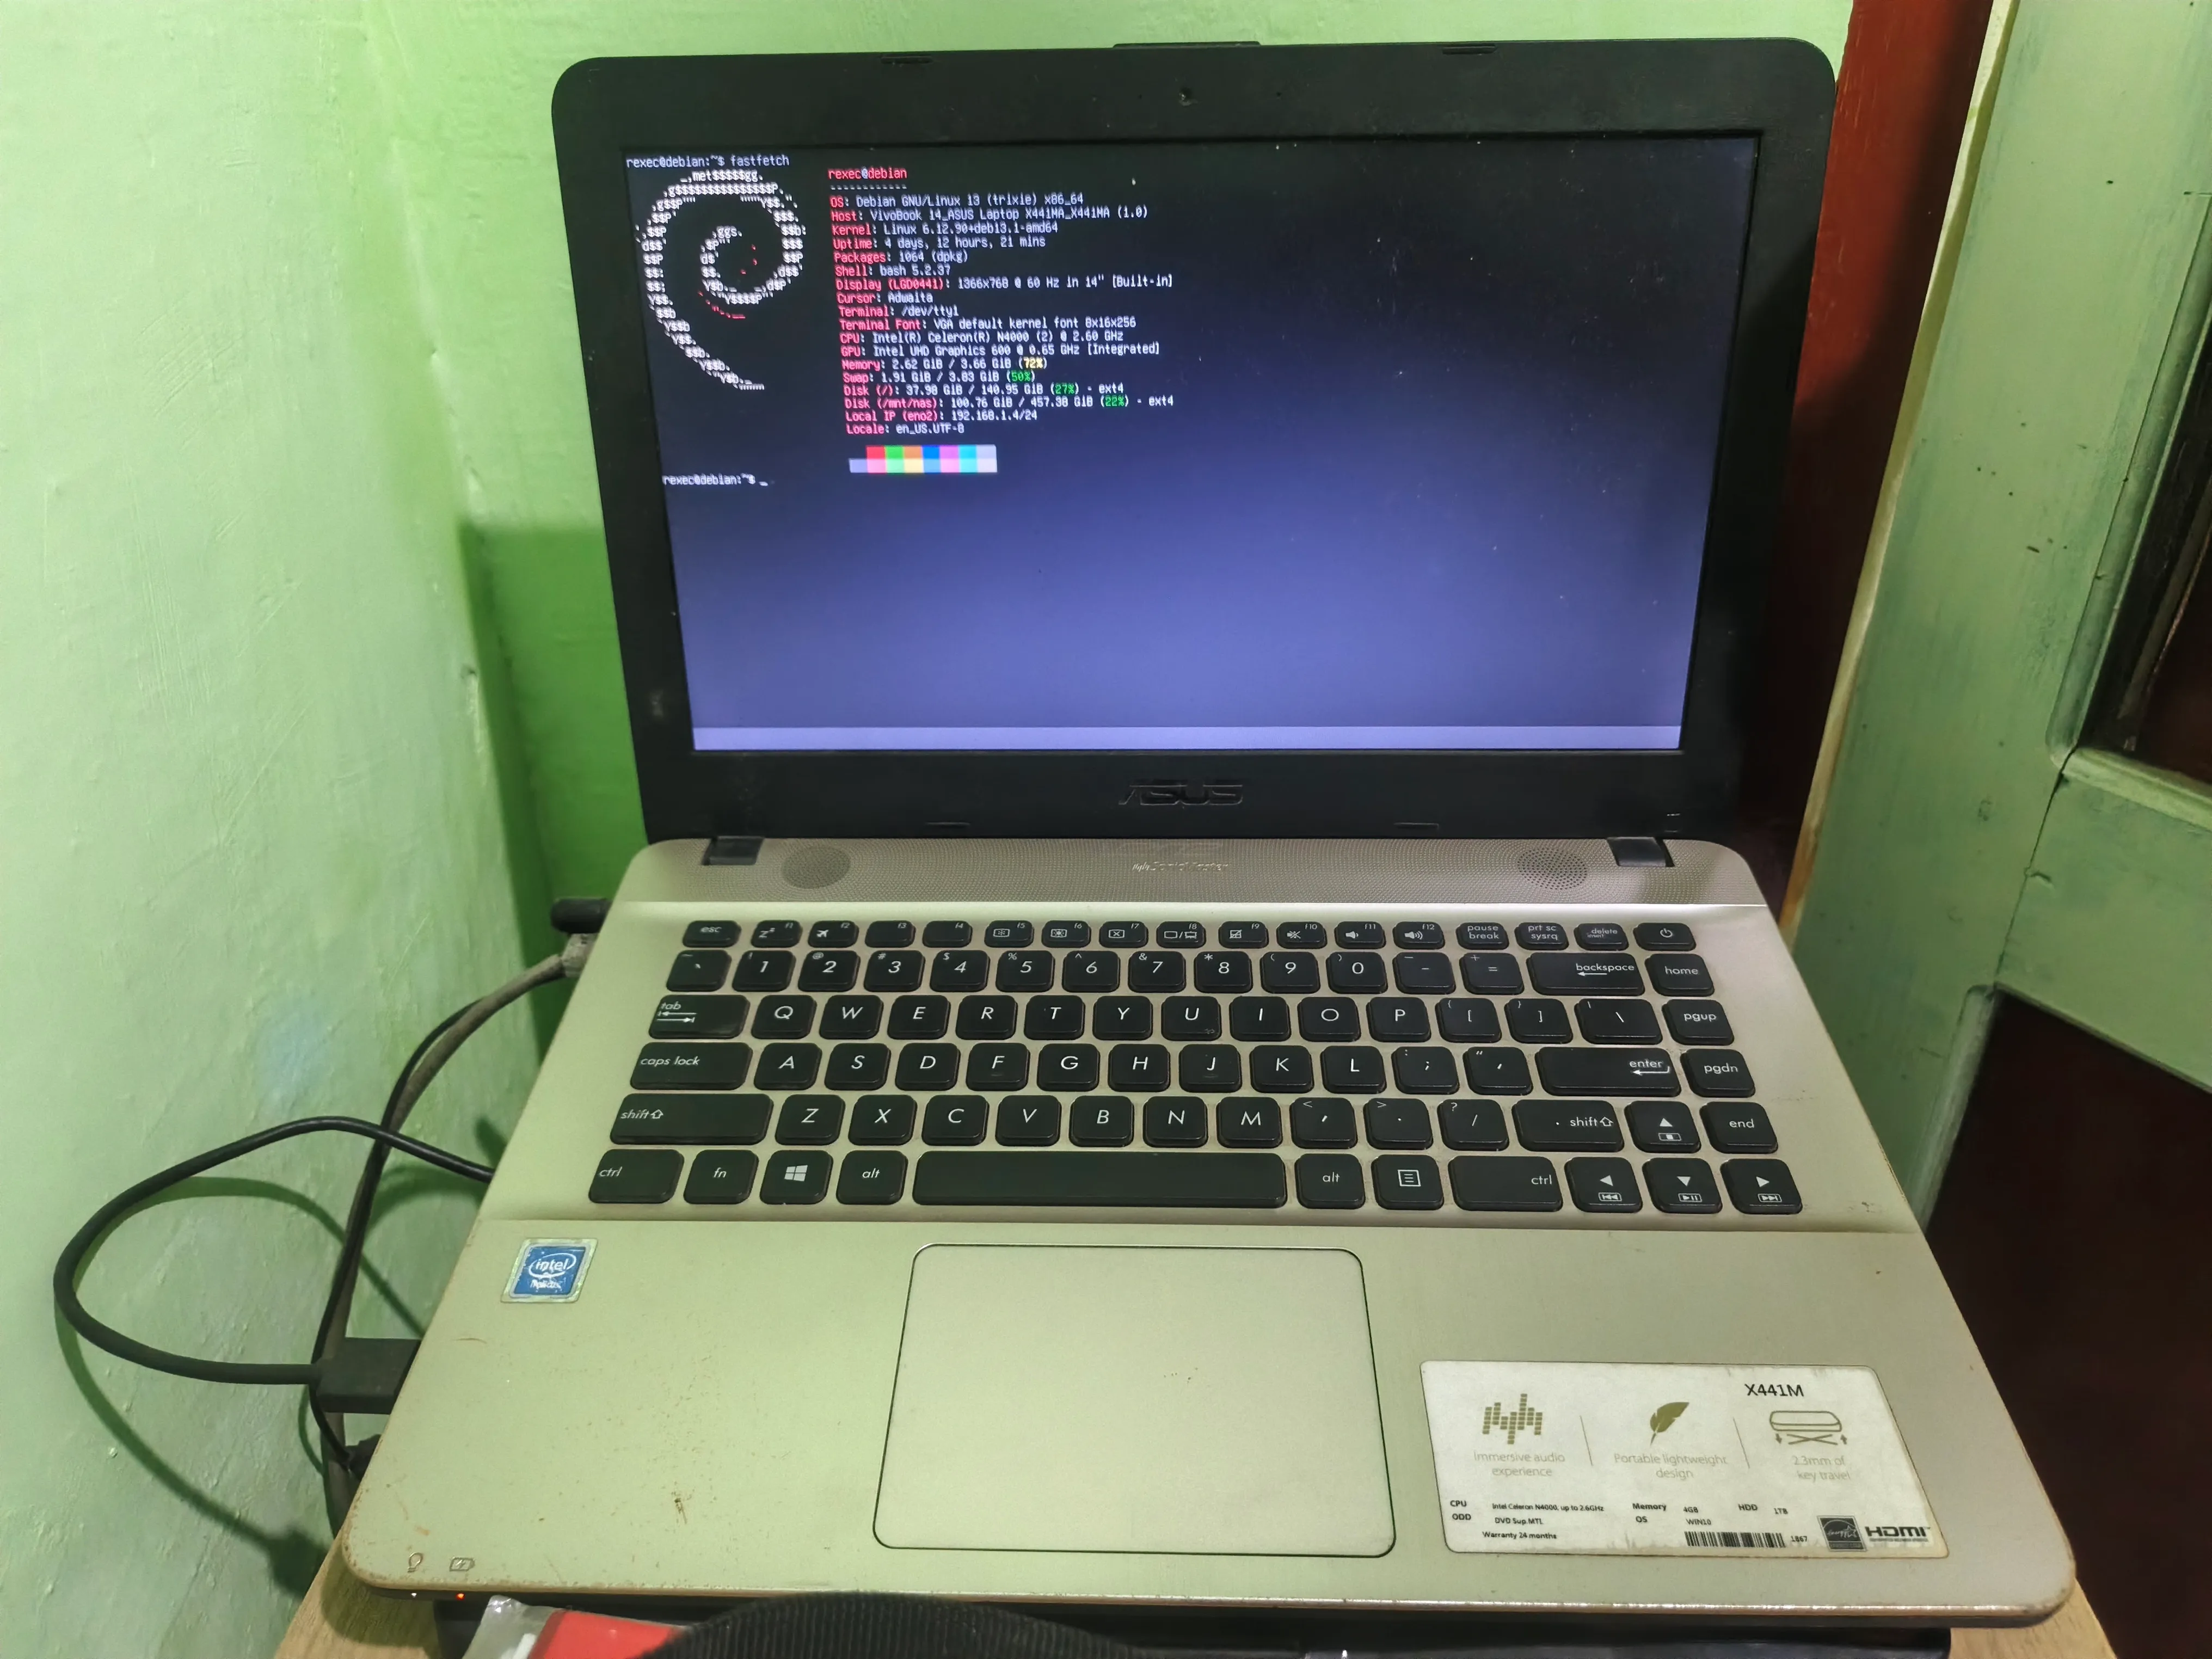
Not the best, but it works. The specs are a Celeron N4000 with 4 cores, 4GB of RAM (one of the motherboard bolts is stripped so I can’t add more, and looking at RAM prices makes my wallet run for its life), a 140GB HDD for the system, and a 500GB drive for storage.
Why an Old Laptop Works Fine
It’s a laptop, so it’s built to be power efficient. Mine sits at around 6W TDP under normal load which is pretty reasonable for something running 24/7. The only real downside is the depleted battery, meaning it has to stay plugged in all the time. That said, a degraded laptop battery still acts as a basic emergency power supply during a short outage, which is a nice accidental feature. (Looking at you, PLN.)
Before the homelab idea, I tried turning it into a smart TV machine, but it was too old to be compatible with Android TV or any of the smart TV ports I tried. So homelab it is.
The Planning Phase
This part was relatively straightforward since I had been using GNU/Linux for a while before any of this. The laptop actually ran Linux Mint first, then Fedora as a daily driver, before I decided to turn it into a server.
For the distro I wanted something stable and predictable, so I went with Debian. Some people ask why not Ubuntu, and the honest answer is I tried Ubuntu on this machine and it was unstable enough that I had to revert. Debian has been solid ever since. I’m not sure if it was the machine or something I did, but I stopped questioning it.
For the ecosystem I could have gone with something like CasaOS to make management easier, but I decided to go DIY instead. I’m running Docker with Portainer to manage containers, and AAPanel for website hosting and experimentation. AAPanel is free, feature-packed, and fits the use case well.
The trickier part was remote access. My ISP uses CGNAT, which means I can’t simply port forward services to the internet since my network sits behind a shared IP. To get around this I set up Tailscale for accessing the homelab from anywhere on my devices, and Cloudflare Tunnel to make specific services publicly accessible without exposing my home network directly.
Beyond that, I’m running Nextcloud, VaultWarden, and a few other services on Docker. I’ve also set up 9Router and a Hermes agent to help manage things remotely and act as a personal digital assistant of sorts.
The Setup Process
Since the display is half broken and I didn’t want to rely on it long term, the first thing I did after installing Debian was get SSH running. That way I could close the lid, tuck the laptop away, and manage everything from my main machine. Effectively turning it headless from day one.
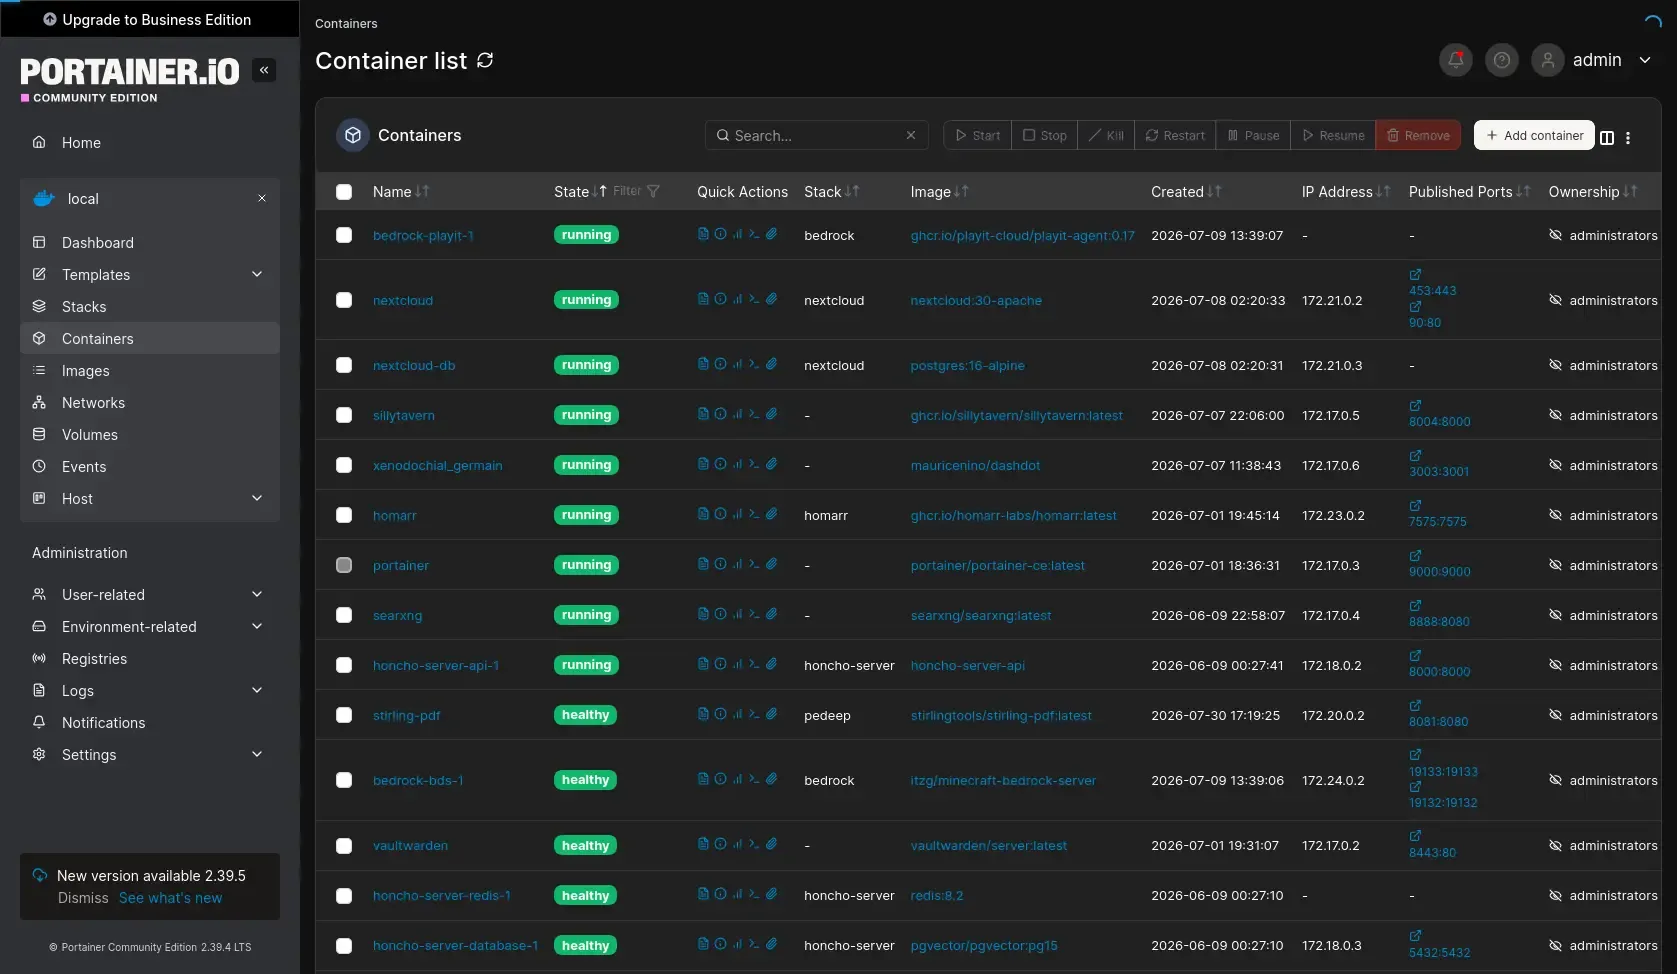
The OS installation itself was straightforward, Debian has a clean installer and nothing unexpected happened there. After the base system was up I installed Docker and Portainer first since almost everything else would run through Docker anyway. Having Portainer up early made managing containers a lot more convenient than running everything through the terminal.
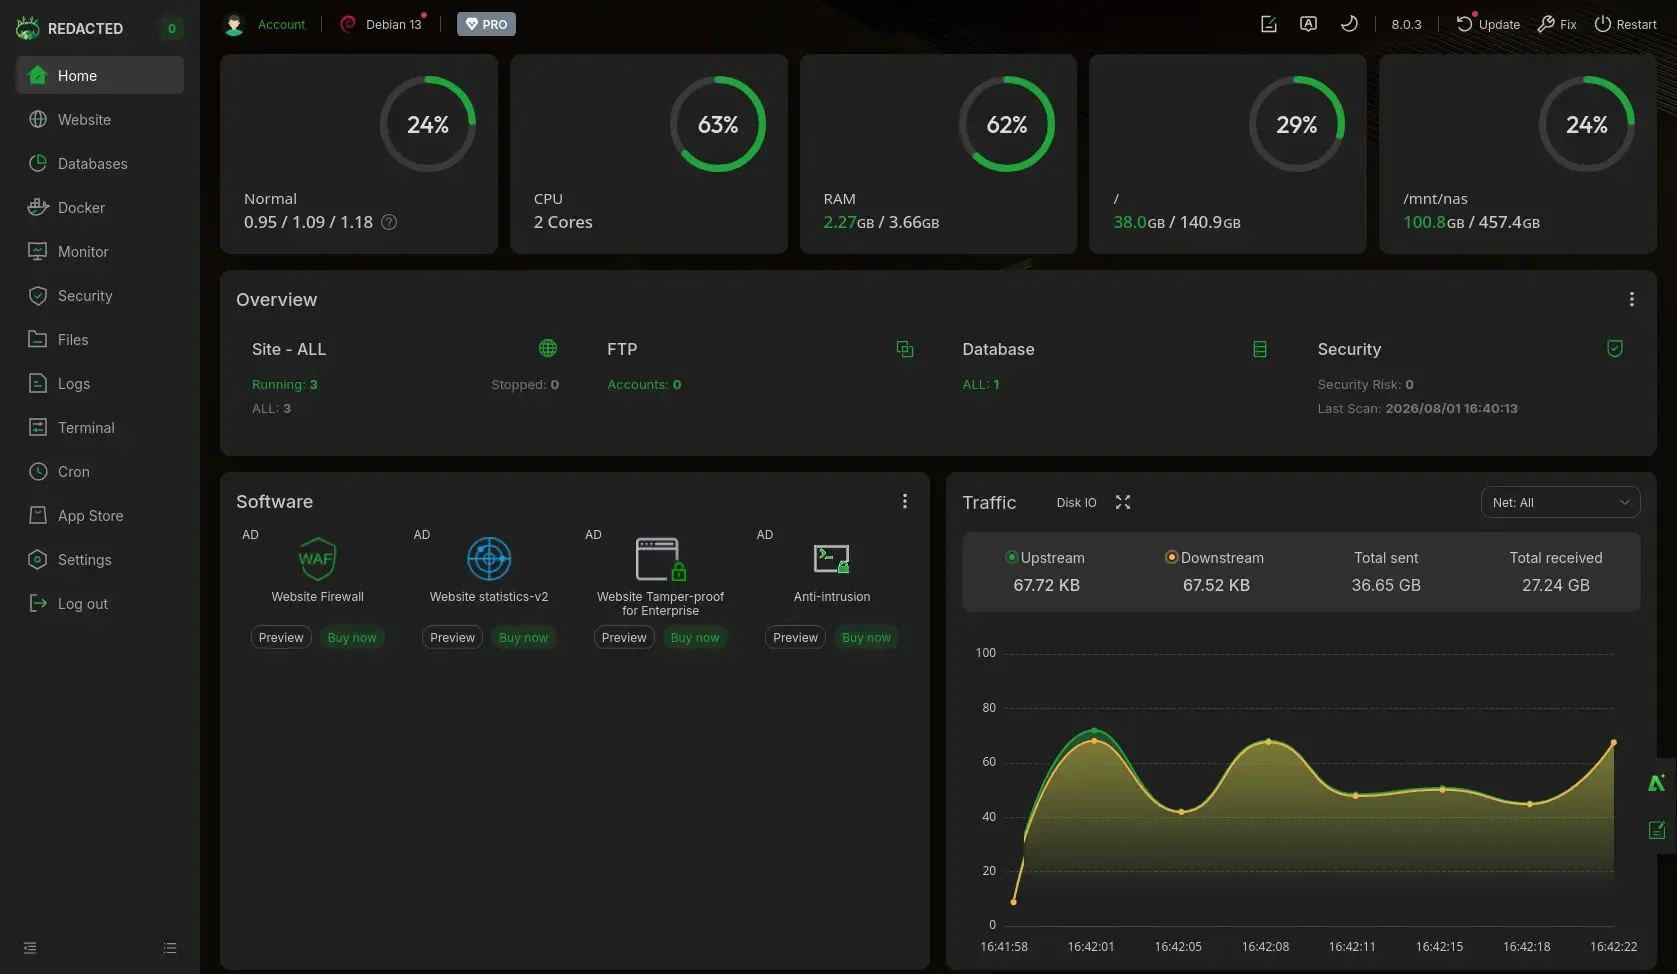
Next was AAPanel for the web hosting side. The installation is a single command which was refreshing, and within a few minutes I had a dashboard to manage sites, databases, and PHP environments without having to configure Nginx by hand every time.
The more interesting part was getting remote access sorted. Since my ISP runs CGNAT I couldn’t just open a port and call it a day. Tailscale went in first, which gave me a private network between my devices so I could reach the homelab securely from anywhere as if it were on the same local network. Then Cloudflare Tunnel handled the public facing side, letting me expose specific services to the internet through Cloudflare’s network without touching my router or exposing my home IP at all.
After that it was mostly just spinning up the services I wanted one by one. Nextcloud for file storage, VaultWarden for password management, and a few other containers along the way. The nice thing about Docker is that adding a new service is usually just a compose file away.
The Part That Went Wrong
Honestly this setup has been more stable than I expected, but it hasn’t been completely smooth either.
The most painful one was the HDD corruption. Because the battery is fully depleted and the power adapter connection is a bit loose, there were a few times where the power cut out unexpectedly, either from an actual outage or just accidentally nudging the adapter at the wrong moment. Eventually that caught up with me and the HDD corrupted badly enough that it wouldn’t boot. Not a fun morning. Since then I’ve been more careful about where I position the cable, and I try not to touch it once the server is running. Not the most elegant solution but it works.
The other thing that caused a few reinstalls was experimenting with different management panels before settling on AAPanel. I tried CloudPanel, CyberPanel, and Coolify at different points, and each one had its own way of conflicting with whatever was already on the system. Some of them modify Nginx configs, some expect to be the only thing managing the web server, and mixing them with an existing Docker setup doesn’t always go smoothly. A couple of those experiments ended with me wiping and starting fresh. Annoying at the time, but I learned more from those reinstalls than I probably would have from things just working.
Final Thoughts
Looking back, setting up a homelab on an old laptop has been one of the more enjoyable side projects I’ve done. It’s fun, occasionally frustrating, and sometimes both at the same time. Corrupted drives and surprise reinstalls included.
If you have an old machine collecting dust somewhere, I’d genuinely recommend giving it a try. You don’t need new hardware, you don’t need a lot of space, and you don’t need to know everything before you start. What I would recommend though is following a tutorial or two on the basics before diving in, not just for the installation steps but for understanding the architecture behind it. Knowing why you’re doing something makes the frustrating moments a lot easier to debug when things inevitably go wrong.
For me personally it’s also been a solid entry point into understanding DevOps more practically. Setting up Docker, managing services, dealing with networking quirks like CGNAT, figuring out why something won’t boot, all of that teaches you things that are hard to get from just reading about them. A homelab gives you a real environment to break things in without any real consequences, which is honestly the best way to learn.
If you’re a developer curious about the infrastructure side of things, an old laptop and a free afternoon is all you really need to get started.